
I had seen Mont Bell garments around for a few years. I liked many of the designs but until recently the sizing was off for me. I dropped weight and Mont Bell made an effort to re size. Now Mont Bell fits true to size for the North American market.
My first real exposure was actually "forced" upon me. I had agreed to do a synthetic jacket reviewforCC.com. They had wanted me to include twoMont Bell jackets. Fair enough and glad we did include them. I learned something from it.
The Mont Bellsynthetic versions really impressed me. I see a lot of gear, as in, a LOT of gear. And I used the Mont Bell Synthetics last spring and through the summer. I kept one (Thermawrap Pro) and continueto use it now in winter. It is a great mid weight by any comparison. And like all the Mont Bell garments I have seen recently an exceptional pattern and fit for me personally.
More on the original synthetic review here:
http://coldthistle.blogspot.com//12/synthetic-insulation-60g-to-100g.html
It waswell over 3 years ago now that the idea of a "gear test" and the resulting,Cold Thistleblog, came from my search for a very warm, down "climbing" jacket.
"I shall not today attempt further to define the kinds of material I understand to be embraced within that shorthand description; and perhaps I could never succeed in intelligibly doing so. But
I know it when I see it,
[Emphasis added.]—Justice Potter Stewart,
I've been around long enough to "know it when I see it" when it comes to a down jacket appropriate for climbing.I've sincelooked at a lot of jackets. Some I tossed aside unworthy, early on and didn't add to this list. Many (5 and counting) of these jackets have been changed a lot since I did my first reviews. So make sure you know what you are looking at. The most recent update (data is from the earlier reviews though) below of the jackets I have thought met that criteria of "climbing jacket":
L or XL
weight insulation @ the shoulderbox wall or sewn through
xEddie Bauer Peak
XV 1091g/ 38.5 5" box
xNarrona
Trollveggan 1063g/
37.5 3" box
xRab Neutrino Plus
794g/ 28 5" box
xArcteryx
Duelly 794g/28 2.5" non
laminated syn
xNarrona Lyngen 737g/ 26 3"
sewn + layer
Mont
Bell Permafrost 694g/24.5 4.5" box
xRab Neutrino Endurance 650g/22.9 3"
sewn
xMtn H Nilas 652g/ 23
3.5" box/sewn thru arms
xEB BC Micro Therm 590g/
21 2.5" sewn + layer
Mont Bell
Mirage 420g/ 14.7 3.5" box
xRab Infinity 402g/ 14
3" sewn
There is a sweet spot
between design, use and weight. Hard to define what will work best for you.
But for my own use generally the warmth to weight ration will cut through all
the fog. What works best for me has little to do with the quality of these
jackets. All are high quality, state of the art, down jackets. Any one of
them will keep you warm on most occasions. Each has a forte' and specific use
worth searching for if you want to spend your money wisely. Without having all
these jackets at hand in front of me there is no way I could have made a
educated decision on what was best for my own use. And I continue to be
surprised almost every time I start making these kinds of comparisons.
Between the fully baffled Eddie Bauer Peak XV and the light weight, sew through Rab
Infinity there is a lot of leeway, weight and warmth.
If you are looking the ultimate example of warmth and light weight construction in a down jacket is boxed wall construction. There has never been any doubt about that. The best down jackets made 40 years ago were box baffled construction and the best now are as well. It isn't a cheap way to make a jacket. It is however the best way to use down as insulation.
On the list above only these are full box baffled construction.
Eddie Bauer Peak XV* #
Narrona Trollveggan(the new one might make 4+")
Rab Neutrino Plus*#
Mont Bell Permafrost*#
Mont Bell Mirage(just under 4",moredetails in another review)
And of those only three jackets* break the legitimate 4" of loft at the shoulder #. These are all really warm jackets but going past 4" of loft is the exception here not the rule.Of those three the Permafrost is the lightest and the least amount of loft..@ 4.5" of 800 fill down.There is 9oz of the 800 downin a medium.
The Mont Bell's are the only large size jacketsin these comparisons. The weights aren't going to be far off for comparisons if you wondered. But a large Mont Bell now fits me like a XL RAB (MB lg is a bit bigger) or XLMountain Hardware Nilas (MB Lg is a bit smaller). "Like"but the Mount Bell jackets actually fit better with my intended layering systemthan either RAB or Mtn H.
Unzip the hood from the Permafrost and you drop 100g or 3.5oz.
4.5" of loft and nowthe Permafrost is 594g, or 21oz. Your decision on what is required of an insulatedhood. But the huge stand up collar and detachable hood gives you some options that don'toften see in these jackets. And something I don't generally like in my own jackets. This one may be a rare exception. I still have to wonder though what the weight would have been if they had ditched the stand up collar for a attached hood. The detachable hood will easily take a climbing helmet with room to spare inside. The zipper, baffleand detailing on the hood attachment is exceptionable.
The more I play with this jacket the more the Permafrostimpresses me for warmth, detailing and value. It fills aniche market no one else even playing in yet. Something I am just beginning to realise Mont Bell does a lot.

More comparisons here:
http://coldthistle.blogspot.com//03/more-on-mid-weight-down-jackets.html

The Permafrost's excellent stand up collar and detachable hood

The RAB Neutrino Plus also hasa stand up collar that includes the hood
with a Velcro "latch". The "latch" allows one to climb in the jacket with the
hood buried and free of snow when it is not up.
The Neutrino Plus also has a 30" back measurement in a XL. The Permafrost is 29". A little weight savings there.
The best pocket combo I have seen in a jacket of this style. Big gloves or 2 liters per side, easy, plus a sun glass pocket. Hand warmer pockets with a micro fleece as well on the outside.


Fair size sun glass pocket and the detailing of a Velcro closure on the big pockets.
The Permafrost hasVelcro and elastic wrist closures which work
extremely well.

The neck and collar are both lined with a super fast drying,soft micro fleece material.

The entire shell has a DWR coating and is made of Gore's Windstopper fabric. Winstopper laminated fabrics have proven to "offer total wind proofness and maximum breathability".

http://www.windstopper.com/remote/Satellite/toc/TechnologyOfComfortFrameset/index
All in all you have a very sophisticated jacket from Mont Bell.here.
Retail is $369.
I think it is well worth searching out the brand in your area and checking them out.
Backcountry.com carries them for mail order and Pro Mountain Sports in Seattle does locally as well.
http://www.promountainsports.com/
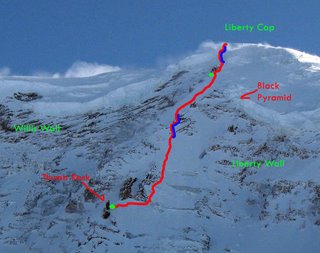 In this close up image of the upper route, green dots represent the high camps and bivies and the blue sections represent areas of difficulty or belays. It's interesting to note that the team took the far right variation out of Thumb Rock.


 Built on the side of a hill, the walls of the Sublett home are all that remain. The back wall had no windows since it faced the hillside.
 The remaining walls of the Sublett home.
 The view from the front of the Sublett home. As beautiful as it can be sometimes, I'm not sure it would be worth it to me to live in such a place. For some it obviously is, but I'm not one of them!
 The Dorgan house was built on a mesa, which overlooked the Sublett home.
 The fireplace in the Dorgan home, made of stone, petrified wood, and adobe bricks, dwarfs the remains of the house. It stands about 10 feet tall.
 A detail of the adobe walls of the remains of the Dorgan home.
 The ruins of the Sublett home, in the center of the picture, appears insignificant in context of its surroundings. The mountains behind the home are in Mexican territory. The Rio Grande flows at the base of those mountains, several miles from the Sublett home.
 The Subletts and Dorgans would have witnessed many such mornings as this. In their struggles to make a living, I wonder if they saw the beauty around them.
 Rapha is one of those companies that people tend to either love, or love to hate. Essentially a manufacturer of high-end cycling clothing, but also a magazine publisher, racing sponsor, event organiser, bicycle design collaborator, and general "lifestyle brand," Rapha promotes an unapologetically romantic vision of roadcycling via an endless output of dreamy images as part of its advertising and social media campaigns. Slender, beautifully backlit cyclists suffer exquisitely as they scale mountains - often in black and white, and often to the accompaniment of haunting music, fostering a sense of nostalgia for a time that is not yet in the past. The garments offered are minimalist and expensive. That is Rapha in a nutshell.
 Now, let me make it clear that I have nothing against Rapha's marketing tactics. I appreciate an effective advertising campaign achieved through emotional channels, and for this they surely deserve an award. When something inspires suchexcellent parody, you know it's reached iconic status. I also have nothing against brands that are considered luxury or high end, if the quality of their products reflects the price. So what's my problem with Rapha? It's not so much a problem, as a genuine feeling of dissonance - at least when it comes to the women's line. When I encounter their clothing in person, what's in front of me does not match the image cultivated by the impressive adverts.
 Take, for instance, theWomen's Stowaway Jacket. Last summer I was desperate for a cycling rain jacket after my old windbreaker came apart. I wanted the jacket to be form-fitting, waterproof, and, ideally, red. Having exhausted the less pricey alternatives, I followed up on a suggestion to try Rapha. The Stowaway happened to be on sale at the Ride Studio Cafe at the time, and I came prepared to buy it. I tried on the jacket. It wasn't bad. I mean, not horrendous. Basically, it looked like a tracksuit top circa 1982 - something you'd expect to see on, say, an East German gymnast of that era. It's an intriguing look if you can pull that sort of thing off,but not especially flattering. The shade of red also strikes me as uninspired: not an exciting bright red and not a classic vintagey-brick either, but a dated crimson that I do not readily associate with cycling.
 True to '80s tracksuits styling, the fit is tight in the chest, but mysteriously baggy above the chest - forming strange folds at the collar that threatened to constrict my breathing.
 And do you see that bulge in the back? You're probably thinking that's the rear pockets. Nope. This cycling jacket has no rear pockets; that's just a bulge that forms on its own.
 Although there are side pockets, they are small - so small, that I had trouble sticking my hands inside. Mind you, none of these design flaws are at all unusual in the sadistic world of women's cycling apparel, and if anything Rapha is not as bad as some of the alternatives. But for me, that is just not good enough given what I was made to expect.
 Moving on to the Classic Women's Jersey - which I had considered when looking for wool cycling clothing: The styling in itself is all right, except that the full-length zipper creates artificial "tummy folds," as is common with this type of jersey.
 The fabric is described as "sportwool," but as soon as I put it on, it became clear that this was a euphemism for a polyester-heavy blend. I later checked and yup: "sportwool" is 60% polyester.
 Though the minimalist design is tasteful and subtle, I would rate the texture of the fabric as average on the rough vs silky scale. And for a hot weather jersey, it seemed somewhat heavy to me.
 One nice thing about the Rapha jerseys, is that they come with arm warmers. Problem is (and I am not the only one to have noted this), that the arm warmers seem to be one size smaller than the jersey - rendering them essentially useless for those whose arms are not stick-thin. Too bad, because including matching arm warmers is a wonderful idea.
 I could go on about other items in the Rapha women's line, but that's probably enough for now. Suffice to say that I find all of it more or less all right, but by no means extraordinary either in quality or looks. I am supportive of what Rapha is trying to do - create inspiring, classic, tasteful, well made cycling clothing. We can certainly use more brands that create such clothing for female cyclists, so really, I am all for it. But come on Rapha: Live up to your image. Watching all those dreamy backlit videos, I expected some truly "epic" women's cycling apparel... and this ain't it.