Thursday, February 25, 2010

for Ruth and Lorene...


Springfield, Missouri ~ November 4, ..
A visit to a cemetery, the name of which I know not, to view the fall foliage. Most of the trees were way past their prime. Except for this one marvelous specimen. A beautiful day!

Wednesday, February 24, 2010

A reminder on crampon fitting....

Just got in two new pairs of boots as I get ready to go to Canada for 10 days of testing,photos and climbing.


I'll take 5 pairs of boots and 5 different crampons to climb in this trip as I attempt to see where I am at physically and mentally.


As I spend the evening fitting crampons this commentcomes to mind,


"Precision crampon technique is impossible without a proper (perfect) fit of boot to crampon."

Jeff Lowe from the WATERFALL ICE video, 2005.


In other words, if your crampons won't stay on the boots first, without latching the binding, likely the crampon doesn't really fit your boot.


Finally some one gets (again) how it is suppose to be. No tricks just a perfect friction fit.

Petzl Lynx on a Scarpa Phantom Ultra and no back binding.


Tuesday, February 23, 2010

Joy and Sorrow

My friend Lorene passed away yesterday afternoon. It has been a rough week. But amongst the sorrow there were times of joy and pleasure in getting to know her son and daughter-in-law and their two children.


Raleigh DL-1: Vintage Dream Come True!

Oh what a happy September 1st! I have a new bicycle!! More accurately, it is a newly-acquired old bicycle. This was completely unplanned, but the opportunity presented itself and I could not pass it up.

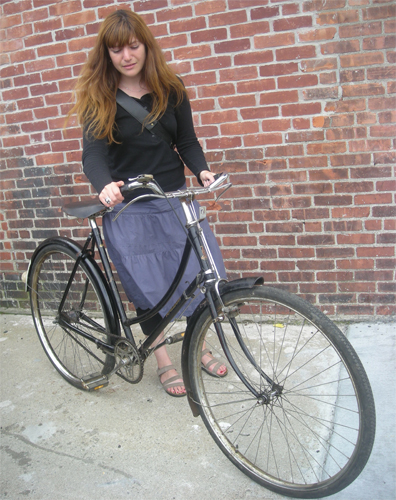
This is a Raleigh DL-1 Lady's Tourist - one of the best known original loop-frame bicycles. I got it from a very nice local collector, and I really can't thank him enough. The 22" frame feels tailor made for me. The actual height of the saddle is the same as on my 21" Lady's Sports, because the seat tube on the DL1 is considerably more slack. This bicycle is in great condition. We will replace the tires and brake pads, and she will be ready to roll.

As you can see, it is missing a chaincase - but I already have a lead on a full chaincase that should fit it. I also have a lead on a set of vintage-style rope skirtguards, the kind that connect to holes in the fender. I love the vintage bicycle community.

Here is the 3-speed Sturmey Archer hub. Filthy but so sexy!

And here is the gear shifter. The DL-1 has rod brakes, which I would not want on a commuter. But I am fine with them on a collector bicycle that I only plan to take on quiet rides.

I have no place to store this bicycle, so I am still not sure how I will deal with it logistically! But this really is a vintage dream come true, so I will think of something. You can see how happy we are together, even before the chaincase/tire/skirtguard upgrades!

Monday, February 22, 2010

A Light in the Forest


Sunlight penetrating the forest depths in Redwood Regional Park.

I highly recommend this park to anyone who lives in or visits the Bay Area. Definitely worth a side trip.

The End is Here!

Well, not the end, as in the end of the world, but rather the end of the Genea-Bloggers Games! It has been a challenging two weeks but worth every broken fingernail and every sore muscle, as well as all of the sleepless nights. LOL. In my book, each and every participant is a winner! It was interesting to me to see how each individual approached their tasks and how they were accomplished. Along the way I picked up a few ideas that can be incorporated into my research and organizational plans. Thank you very much.

A special "Thank You" and "Congratulations" goes out to the organizing committee consisting of Miriam Midkiff, Kathryn M. Doyle, and Thomas MacEntee. In addition, footnoteMaven is also to be commended for providing the logo and for creating the "medals" that will be awarded during the Closing Ceremonies.

My original goals for the games did not list each specific task to be accomplished but my intent was to compete in each category. (Retirement is Great!) So, how did I do? Quite well, thank you!

1. Go Back and Cite Your Sources! Bronze Medal.
This category is the weakest link in my research. Back in the "early days" when I first started using a program to record family information there was no sourcing option, so all of my source information was put in notes. I know where (most of) the information came from, it just isn't in the proper format. As I migrated to more modern software I never took the time to add proper source citations. I haven't downloaded the new version of Legacy yet but I understand their source writer will make the job easier and help maintain consistency. Anyway, bottom line is that yesterday I entered 15 or so "proper" citations in my database earning a bronze medal.

2. Back Up Your Data! The committee will have to determine the medal count for this category as tasks A and C were in place prior to the beginning of the competition.
A. Prepare a comprehensive backup plan for your digital research files and a security plan for your hard copies and photos. [Third Update]
B. Secure your hard copies and photos in waterproof containers. - I purchased several plastic totes and have put the "most important" documents and photos in them. I don't know how "waterproof" these containers are - I'm sure that they would fill up with water if completely covered. But they are certainly better than the cardboard "bankers boxes" that I have been using. It simply isn't feasible to store "everything" (20+ years of research) in plastic containers.
C. Backup all your data using a flash drive, an external drive, CDs, DVDs, or an online resource. [Third Update]

3. Organize Your Research! Platinum Medal.
A. Organize at least 20 hard files or ancestral items. [Fifth Update]
B. Organize at least 20 digital files into folders, add metadata, etc. [Fourth Update]
C. Organize at least 20 photos into photo albums, protective holders, boxes, etc. [First Day]
D. Organize at least 20 digital photos into folders, add metadata, etc. [Fifth Update]
E. Create at least 20 data entries in your database, or scan 20 photos, or scan 20 documents. [Third Update]
F. Create a master list of your files and notify your family members of where it is stored. Not completed - added to my "to do" list.

4. Write, Write, Write! Diamond Medal.
A. Write a summary of what your blog is about and post it on your blog. [First Day - What's it all about?]
B. Participate in a genealogy or family history related blog carnival. [Third Update - Say What? submitted to COG 54]
C. Prepare several posts in draft mode and pre-publish. [Fourth Update]
E. Sign up to host a future carnival. I will be hosting the October edition of Smile for the Camera.

5. Reach Out & Perform Genealogical Acts of Kindness! Platinum Medal.
A. Comment on a new (to you) genea-blog. [Second Update]
B. Join another genea-blogger’s blog network on Facebook Blog Networks. [Second Update]
C. Invite other genealogists to join Facebook. [Fourth Update]
D. Assist another researcher with a research request or lookup. [Third Update]
E. Participate in an indexing project. [Second Update]
F. Join a genealogical, historical, heritage or lineage society. [Third Update]

A Symbol of My Heritage

Stay tuned for the Closing Ceremonies to be posted by Thomas on Monday, August 25th, at Destination: Austin Family.

Sunday, February 21, 2010

A quick fix for the "new" Nomic or Ergo pommels..

Petzl is now offering to fix anynew tool under warrenty. Petzl'sis adding a pin through the pommel which is a much better solution than epoxy imo. Petzl was quick to respond and offer a fix and a replacement. They are a good company to support.


This is not an authorised Petzl solution for beefing up the pommels on the new Nomic and Ergo but it is the best I can come up with and not alter the handles.


Alter the actual tool handle and you void the warranty. Which you don't want to do!


The issue is that the pommels themselves are stripping out the adjustment system and wrecking the handles.

Pommels are easy to modify and inexpensive to replace. Petzl should love what I am about to suggest as it willprotect both your investment and Petzl's at least in the short term.


Couple of cautions first from my own experience. Make sure of the size you want the grip set at. Doing what I will suggest makes them bolted and glued into placeat only onesize. You could buy extra pommels when they become available through Petzl and do the same thing but with a different hand size setting if required. And have another size grip, bigger or smaller or all three. Just takes a extra pair of pommels for each grip size you'll require.


I found that I could climb on the smallestsize settingon the first day but by the second day of climbing my hands were swollen enough that I had to go up to the medium setting as the smallest size had become just a bit too tight and slightly painful. And these weren't the first days of the season for me.


That surprised me as the new tools have slightly different settings from the original Nomics. A bit smaller and a bit bigger in the same settings it seems.


OK, the short term fix? I used an industrial strengthsteel epoxy to fill in the bottom of the slot inthe pommel.But first and the most important, if you want to maintain the warranty, is be sure to use an epoxy that can be usedwith arelease agent. I used Steel Bed from Brownell's. (http://www.brownell's.com/) A number of similar products out there but that is one I am very familiar with. It will certainly reinforce the pommels...but no idea if it will keep them in one place long term. Seriously...I doubt it. Knowing the abuse these tools take it is not the best answer but an easy fix, short term.. But not a lot of options at the moment either.

Back to the fix I used.


Be sure to give the end of the shaft a liberal layer of release agent and cover everything including the nooks and crannies. Then add just enough epoxy (a layer 3 or 4 mm thick in the bottom of the pommel cut should do) of your choice to have it pushed out the end of the pommel on either side when you bolt your pommels back on. It won't take much so don't over do it here. Make sure the pommels are in the correct position that you choose before starting. Make sure both tools are the same position! Wipe off the excess that was pressed out when you slide and then bolted the pommel down. Let the parts drythe suggested 24 or 36 hrs. The longer the cure time usually the stronger the resin-epoxy bond's strength.


I'm off for 5 days of ice climbing in the morning so we'll see just how long the "fix"lasts.


Factory shaft with umbilical attachment hole pre drilled and beveled by Pertzl. Nicely done. And the three obvious pommel adjustment notches that are failing on the right hand side of the shaft.

4mm cord easily fits into the factoryumbilical hole if you want a lower profile umbilical attachment.

Cord and pommel in place at the medium setting..but not bolted down yet. It had better be right when you put this all together because you won't be moving it again other than to replace it after you have added the epoxy bedding material.

Easy to see here the tiny bit of pommel I groundoff to fit an umbilical clip cord if that is something you want to do while you are working on the shaft. The new pommels are aneasily replaceable part and inexpensive.


In the pictures below I am holding the pommel so you can look down into the shaft's slot and see the single steel engagement tooth. I laid a thick layer of Steel Bed Epoxy into that slot which covered the single steel "tooth." Putting your chosen bedding compound-epoxy here will help prevent the shaft end of the tool from being strippedout by excess movement of the pommel in hard use. The idea is to reinforce the steel notch pin in the pommel by addingsome support with the steel based epoxy in the other adjustment slots.


If you want to run umbilicals Petzl has made that easy now by the hole in the shaft able to take4mm or 5mm cord. Easy to grind off the back end of the pommels and thankfully not change the feel on the grip. 4 or 5mm cord will generally be about the same strength as the commercial umbilicals like Grivel's and BD's.

Pinto Horse


Harringworth Lodge on a misty afternoon.

About 3 miles.


Ducks (mallards) and a heron by the lake and a few smaller water-birds, plus the inevitable rattling pheasant.

Monday, February 15, 2010

Cliff Ice at High Falls


Today felt more like a spring day than a December day, with temperatures approaching 40 degrees and rain falling all afternoon. The mild day made for a pleasant walk in the woods (well, before the rain started it was pleasant). I decided to take advantage of the warm weather and took a walk to High Falls on the Pigeon River in Grand Portage State Park. Along the walk to the falls there were tracks everywhere... from squirrels, birds, rabbits and mink to dogs (accompanying their human companions on their own walks to the falls). The cliff that High Falls drops over was amazing, with incredible ice formations everywhere along the rocks that make up the face of the cliff. This particular composition was just to the right of the main flow of water as it drops over the falls. This was taken with my 100-400mm lens fully extended at 400mm.

Sunday, February 14, 2010

The Ringling Museum of Art


I have not been keeping up on our blog at all this summer. I still take lots and lots of pictures but when it comes to moving them from my laptop to the blog, I admit my motivation just has not been there. For the most part, I am so deeply immersed in our lives here, I just don't even think of the blog at all. Then we will go and do something like visit an art museum that we have been to before and I remember the blog and remember how nice it is to have the blog there as a record of the places we have visited.


Last weekend, we were grateful to have Aric come and visit us. He and I went to The Ringling Museum together. He came back to visit again this weekend and we took another trip over there, this time bringing Nathan and Lee with us.


I was able to do the Ca'D 'Zan tour this time. I have been on the bottom floor for a self-guided tour but have never been on the top floor. It is such an interesting place with an interesting history.


My favorite part of this beautiful place is the Art Museum. Each time we visit, I end up thinking I wish we had more time there and this time was no exception. I truly love this museum.


We bought a membership so I'm guessing we'll be back a few more times over the next year. Hopefully I will remember to take pictures and maybe even blog about it!


Living the life in S Florida!

Saturday, February 13, 2010

Little Wild Horse Canyon


For the majority of our honeymoon Jessica and I explored the canyonlands of southern Utah for a couple of weeks. We had beautiful weather for the majority of the trip and did 16 hikes that added up to a total distance of 64 miles. We wanted to stay away from the large crowds that often plague national parks of the southwest, so we focused primarily on exploring and hiking within Grand Staircase-Escalante National Monument. This monument is administerednot by the NPS (National Park Service)but by the BLM (Bureau of Land Management). The monument consists mostly of dirt backroads leading to trailheads with trails that have little to no maintenance but lead to some incredible canyons. Most, but not all, of our hikes were within this monument.


Our first canyon hike was in Little Wild Horse Canyon, not far from Goblin Valley State Park. We left our motel in Green River early in the morning hoping to be the first ones at the trailhead. Our plan worked as we were the only vehicle in sight when we arrived at the start of the trail. The trail was beautiful right from the beginning as it headed up the wash. Before long we were in the canyon, but it was quite wide at that point. Not long after hiking up and around a dry fall, we were in the canyon narrows. This is where it got really interesting. The canyon had several nice sections of narrows and in the narrowest section we had to turn sideways in order to make it through. Eventually we came to a few boulders wedged in the canyon that put a stop to our forward progress. At this point we turned around and returned to the trailhead via the same route we came in on. It was a wonderful start to our canyon adventure!


Thursday, February 11, 2010

favorite foto - really?

It's impossible. I just can't think about it anymore. I can't take the pressure. The stress of making a decision is overwhelming. Sorry, fM, I can't do it!

No way can I choose just one favorite photograph from my collection for Smile for the Camera. Each one is precious to me. All of them. The "old" family photos as well as current ones. And what of all those non-family pictures, the landscapes, the flowers and the vacation pix. OMG, there are so many pictures that could be called favorites. Really, I can't have just one! (You will find many of my favorites included in family posts, scattered throughout the blog. And some of my favorite "scenic" photos are being included in my "Wordless Wednesday" posts.)

So, what you get for this "favorites" edition of "Smile" is Becky in the Freezer! You will have to take my word for it that it is me in the picture. Notice the eyes? Like those of a deer caught in the headlights of a car - panic stricken. Thanks a lot fM ;-)


It's 1975 and I was stationed at the Photo Lab on the Naval Air Station at Point Mugu, California. I don't recall exactly what it was I was photographing that day but the "freezer" was a large climate-controlled building used for testing "stuff" for cold weather use. The walls behind me were being tested for environmental stability under extreme cold conditions. Cold, as in Antarctica cold. It was a big building. And it was cold inside! Really, really cold.

It wasn't easy to see through the "looking glass" to take the pictures. Not with a mask covering the lower portion of my face. And glasses. Glasses that got steamed up and then frosted over. I remember trying to focus the lens (yes, it was back in the days before auto-focus was even thought of). Couldn't see anything clearly. Taking off the glasses didn't help. I couldn't see more than a few feet without them. Basically, I guessed and hoped for the best.

Copyright: Photograph in the collection of Virginia R. Wiseman. Who owns the copyright to this picture? Not me, I didn't take it. A fellow photographer's mate, whose name I no longer recall, is the one who clicked the shutter. He was in the Navy on an assignment. It's a government photograph. Previously unpublished, and as far as I know, I'm the only one who has a print of it. What say you, Craig? Is it in the Public Domain, no copyright?

BestBug

I got them at BestBug!

What strange little insects, that looked like miniature beetles with longish snouts. Turns out, that's more or less the definition of weevils.

These are in the subfamily Baridinae, probably Odontocorynus scutellumalbum. What a mouthful of a name! It may change though, because according to Wiki, "the higher classification of weevils is in a state of flux". I imagine it's an exciting time for entomologists.

Several were feeding on Rudbeckia. Not being familiar with weevils yet, I'd temporarily named the photo files "besbug" as shorthand for black-eyed-susan-bug. It started me thinking, what if people were as interested in insects as in electronics. When showing off your creepy-crawlies, you could tell your friends that you got a really good deal at BestBug.

Look twice

Anyway, I found another one on a daisy.

I didn't notice until processing the photos back home, that there was something sinister lurking below.

What lies beneath

Eek! I think that little weevil is in for a big surprise.

I wish I'd realized the whole picture when I was there. I wonder who came out alive. Who won Best Bug? In hopes of the preservation of local wildflowers, I think I'd have to root for the spider.

-----

Update:
In case you've got a dark computer screen, let me lighten that last picture up for you.


Eek!

Wednesday, February 10, 2010

Scenic Cycling: National Seashore, Cape Cod

Cycling on Cape Cod is a remarkable experience. Earlier I wrote that we had been looking forward to the Cape Cod Rail Trail. We have now been on it twice, but to tell the truth it is not my favourite place to cycle on the Cape. Don't get me wrong: It is a nice, long trail through attractive wooded areas with relatively few interruptions. It is a great resource. But the special thing about Cape Cod is its abundance of coastland: the open ocean and bay views, the coves, the miles of saltwater marshes and sand dunes. The rail trail bypasses all of that, and so I feel that cycling on it does not capture the essence of the area. For a real "wow" experience, I recommend cycling along the National Seashore - a 40-mile stretch of coastal nature reserve with breathtaking views. You will have to cycle on the road with motor vehicles, but the route is very bike-friendly.

If you are hesitant to share long stretches of the road with cars, you can arrive to the National Seashore via the Rail Trail (pdf map here). Towards the very end of the trail in Wellfleet, turn right on Marconi Beach Road (above two photos) and this will take you right to the dunes. This road is spacious, virtually free of traffic, and breathtakingly scenic. It ends at Marconi Beach and the Marconi Station Observation area.

At the end of Marconi Beach Road is this beautiful landscape of sand dunes, tall grasses and miniature trees - on a hill overlooking the ocean.

Lucy and Rodney, our vintage Raleighs, found the area very romantic. Here they are enjoying the view of the dunes.

And here they are gazing at the ocean.

The Co-Habitant joins them in Thoreau-like meditation.

Here is Lucy Threespeed on her own, posing in front of the Marconi Station exhibit. Guglielmo Marconi is commonly credited with having invented the radio, and the Marconi Station in Wellfleet MA is the site of the first successfully completed transatlantic wireless communication between the U.S. and England in 1903.

There are many beautiful sites to photograph, but we were too busy cycling. These photos should give you an idea of the area's natural beauty.

Exhausted but pleased, Lucy and Rodney look forward to their next visit to this unique and wonderful place.

Sunday, February 7, 2010

Thursday, February 4, 2010

The Phend Surname

The "Phend" surname, as you might imagine, is not a common one. The index to the book on the Phend Family that was published in 1991 only includes 331 people with the surname, and that included everyone that I had found since the family came from Switzerland to the United States in 1832. Johannes Phend, the progenitor of our family, had two daughters and two sons, John and Jacob. John didn't have any children. Jacob had seven children, six sons and one daughter; there were 43 grandchildren, 29 grandsons and 14 granddaughters. In the next generation the numbers flipped and girls outnumbered the boys by about 2 to 1.

According to my Grandpa Vic, his grandfather, Jacob, pronounced the Phend surname as "pay-hend" and said that it was spelt pay-hay-a-n-day. He also told me it was originally spelled with a B instead of a P but that the B was pronounced softly like a P and that is how it got changed from B'hend to Phend. However, in Swiss records the surname has been found spelled as B'hend, Bhend, Fend, Fendt and Pend. In the United States, the surname has also been found in records as Fend, Fiend, Fin, Phind, Pheud, Phena, and Phent.

Considering that names were often spelled phonetically, and the fact that many record keepers and census takers wrote so poorly, the variations are not all that surprising. It just sometimes makes it a bit challenging to find the right records.


Johannes Phend was recorded as Jean (or Sean?) B'hend on his 1832 passport.


The signature of Johannes on his passport.


The Land Record from Carroll County, Ohio (Deed Book 11, page 367) showed John Phend and his wife Susan selling their land in 1849 - and his signature!

The family was found in census records the "old fashioned" way - by turning the crank and going through the reels of microfilm image by image, before indexes were widely available, and before the internet. Lucky for me, from other records, I knew where to look and the townships they lived in were relatively small.

1840 Carroll County, Ohio (Brown Township page 192)


1850 Greene County, Indiana (Taylor Township page 409b)

1860 Marshall County, Indiana (German Township page 56)


1870 Kosciusko County, Indiana (Scott Township page 434)

1880 Kosciusko County, Indiana (Scott Township page 33)


In 1900 and 1910, Jacob was livng with his daughter and her husband, Sophia and John Ernest, in Elkhart County, Indiana. (Nappanee, Locke Township page 232 in 1900 and in Concord Township page 56b in 1910)

Three other recent posts highlight some family records from Switzerland, the christening record of Johannes Fendt, and the family's emigration to the United States.